Tuesday, April 30, 2013

Geometry: Geoboard

I have been checking out the app store for some apps that I could incorporate into my Geometry classroom.  I came across an app called "Geoboard".  Basically this is an app to replace the pegboard and rubber band set manipulative.

I found this app and played with it a little bit, but I have not done much more with it.  Since the one-to-one rollout for students is coming soon, I have started to think about how the iPad and iPad apps could help enhance my instruction. I was reading a blog by Dan Meyer which talked about incorporating math games within the math classroom.  I am always looking for ways to give my students more hands on experiences, so I thought about the Geoboard app, and decided to look around for some ideas.

I found an article on math.about.com that talked about different ways to incorporate a Geoboard into the math classroom.  I found several good ideas that could lead to some higher order thinking questions.  I plan to incorporate some of the following ideas once the students are equipped with their iPads!


  1. Geoboards can be used to talk about different types of symmetry: line and rotational.
  2. Use the Geoboard app to have students "draw" different geometric figures.  Students can work on shape name recall (isosceles triangle, rhombus, etc).  This could also lead into a discussion about how students know their shape satisfies different property requirements.  For example, if a student draws a rhombus (as shown to the right) how can they be sure that the figure has four congruent sides.  This could lead into a discussion about proof, distance formula, and a variety of other higher level thinking topics.
  3. A Geoboard can also be used to aid discussions about perimeter and area.  You can have students "draw" a shape and calculate the area.  You can also have students extend their knowledge by asking them to "draw" a shape that has a specified area.  For example, "draw" a triangle that has an area of 3 square units.
  4. Geoboards can also be used to explore the concepts of similarity and congruence.

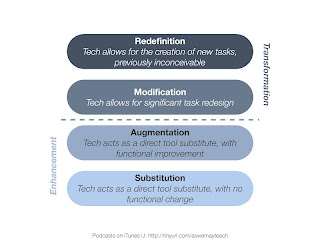
The SAMR Model

The hot new topic at Waukesha North High School is the SAMR model.  This model was developed by Dr. Ruben Puentudura to guide teachers with integrating technology to increase overall student understanding, success, and achievement.  With our one-to-one rollout for teachers coming on Thursday, I thought I would take a moment to reflect on my understanding of the SAMR model and solidify my thoughts before our journey gets on its way.

The four levels of the SAMR model are as follows: Substitution, Augmentation, Modification, and Redefinition.  The Substitution and Augmentation levels are part of the enhancement category in the SAMR model.  The modification and redefinition levels are part of the transformation category in the SAMR model.  The ultimate goal of the SAMR model is to transform what happens in the classroom in the modification and redefinition levels.  Now with the terms outlined, let's take a closer look at what each on entails.

In the substitution level, the technology acts as a direct substitute.  In this substitution, there is no functional change or enhancement to instruction.  For example, let's say that you have a worksheet that you would like your students to complete.  Rather than making a paper copy of the worksheet for your students, you could make the worksheet available on the iPad.  At Waukesha North, I would convert my worksheet to a PDF and make a link to this document on my BlackBoard class website.  When it was time for the students to use the worksheet, they would go to the BlackBoard site and click on the link to download the file.  The worksheet would open up in a program like Notability and complete the worksheet as normal.  The use of a stylus would be handy in this case.  The worksheet and the activity don't change, just the way students see it.

The next level is augmentation.  In this level the technology acts as a direct substitute, but offers some functional improvement.  For example, I could create a short formative assessment using google forms. Students could complete this formative assessment as an entrance activity and submit their responses.  I could then gather the responses and create flexible groups based on the data from the quick formative assessment.  The use of the google form would allow the teacher to get data on each individual student and check for student understanding, rather than spot checking a few students.  The technology is a direct substitute for a paper and pencil formative assessment, but the activity is enhanced because the teacher has immediate feedback and can then address the different abilities of students and progress from there.

In the modification level the technology allows for significant task redesign.  For example, I could have students work in groups on an problem solving activity.  The group could figure out how to solve the problem and then create a video, via an app such as Educreations, Explain Everything, etc., where they explain, step-by-step, how they solved the problem.  The video could then be posted online (to a site such as BlackBoard) so that students could use it as a tutorial and study aid.

In the redefinition level the technology allows us to do things that were never before possible.  As a teacher, you would not spend the majority of your time in the redefinition phase.  I think if it as going to Grandma's house.  You love to visit, you have a great time, but it's not someplace that you're ready to move.  For example, you could have students create a portfolio of knowledge over a period of time (quarter, semester, year) using the Book Creator App.  This portfolio can contain notes of important concepts and sample problems. This portfolio could serve as a quick reference guide for students to use after they leave the classroom. This would be especially handy in the math classroom because the content builds on itself. If a student needed a quick refresher, they could look at a quick one or two page summary. It would (hopefully) be easy for the student to understand because the student was the author.


Friday, April 26, 2013

Screen Casting with Quick Time

On Wednesday I learned how to make a screen cast using quick time on my MacBook Air.  Quick time has the capability of creating a video using the camera on the computer or a screen cast where just the screen is visible.  Both options include the ability to add audio to your recording.

Here's how I created a screen cast:

  1. Click on the launch pad and open the quick time player. 
  2. Under the file menu, there are three choices:
    1. New Movie Recording
    2. New Audio Recording
    3. New Screen Recording
  3. In order to create a screen cast, you want to choose the third option: New Screen Recording
  4. A window will appear that has a red record button.  Once you are ready to record, click the button.  You can choose to either record the entire screen or a portion of the screen.  
  5. When you have finished recording, press the stop button.
  6. You may send your completed video through e-mail or upload it using YouTube or a variety of other sources.  To get to this menu, look at the play back window that appears on the bottom of the screen.  Click the small icon on the right had side of the window (it looks like a rectangle with an arrow).

This screen cast can be a powerful tool to walk students through new software, a website, or explain content.

Friday, April 12, 2013

Getting Creative with Phoster!

As a yearbook advisor I am in charge of overseeing students as they create the school's yearbook.  We also need to make sure that we do a good job in the marketing department so that we can sell the book to our students (and not fall into debt).    As the economy has declined, this has gotten trickier and trickier.

A colleague told me to check out "Apps Gone Free" which gives a list of a few apps that are free for the day.  Over spring break I went download crazy with apps for the iPad thanks to "Apps Gone Free".  One of the apps I downloaded was "Phoster".

Phoster is an app that will take a picture from your camera roll on the iPad (or allow you to snap a new one) and turn it into a poster.  I played with it a bit over break, and I had a few of my yearbook students try it out yesterday during class.

The app is pretty basic.  You choose a layout, pick a picture, add some text, and viola!, a poster is created.  At this point we have sent out our marketing poster as a tweet and we will be printing out a few color copies to hang around the school.

As a quick marketing tool for yearbook, this could be a pretty cool tool.  Here's what my students created yesterday:

Thursday, April 11, 2013

Creating a Video with Educreations

In an attempt to prepare for next year's Waukesha One initiative (and to try "Flipping the Classroom"), I have started to dabble with creating a few short math videos.  The program I tried was "Educreations".  Although this app is not perfect, I was able to successfully create some videos.

With Educreations, I am able to create a voice-over video that can contain images.  The nice thing about Educreations is that a presentation can be made up of multiple slides.  Before I started recording my lesson, I created a template for my slides.  I went through and typed in the definitions and new Geometric theorems related to the material I was teaching.  I then imported some images.  Educreations allowed me to search the web for images.  I was able to find some diagrams related to the theorems I was teaching and I crafted my sample problems around them.  Once I had my template set, I was able to start recording the voice-over.  I pressed the record button and got to work.  I explained each slide and was able to work through each of my sample problems step by step.  One of the downfalls of Educreations is that if you make a mistake with the video voice over, and are a perfectionists, you will need to record the entire segment over again.  Once this process was completed, I was able to post a link to my video through my BlackBoard class website.

Since I am still new to this video-making process, it did take a while to create the video.  To make a three minute video took between a half hour and an hour (including the lesson planning around the images I found online).  Like I said, I am new to this process so I expect I will be able to create videos faster in the future.

Here's a link to one of the first videos that I created.  It's not perfect, but it's a good starting point.

http://www.educreations.com/lesson/view/properties-of-parallelograms/5047554/?s=YLwcxd&ref=app


The student feedback that I received was fairly positive.  Although they weren't sure if they wanted to flip the classroom everyday, they did want to try the experience again.

Let the Journey Begin!

I am a teacher at Waukesha North High School and a member of our school's VanGuard team.  Earlier this year our school announced that next year we will be issuing the latest and greatest iPads to our students in an effort to creating Waukesha One.  Last night our school board approved the purchase of staff devices (including a MacBook Air and an iPad).  The hope is that the approval for student devices will be coming next month and we will be ready to roll out with Waukesha One at the beginning of the 2013-2014 school year.  

In preparing for this journey, I have been checking things out online, looking at blogs, etc.  I thought I would share my experiences in transitioning my math, computer science and yearbook classrooms to the 1:1 environment.

So far, I have just dabbled with some of the apps, but I see some amazing potential for how this technology can transform the way students learn.  I know this journey will transform the way I think about teaching and it will transform the way my students think about learning.  I know this will not be an easy road to travel. I will run into some problems that will make me want to scream, but I think the journey will be worth it!